För denna beskrivning på Svenska; klicka här!
Some words before we start
A lot of people find setting sleeves to be the hardest part about sewing. That is why have made this small troubleshooting manual to make your future sleeve setting a bit easier.
It is written from the point of getting a “god looking sleeve”. One should note that a good looking sleeve is not always a historically correct sleeve. Some creasing and pulling is accurate and you have to decide on either pleasing your modern eye or your historical and also choosing between form and function.
There is no way of you always getting both pretty and functional.
This guide is written so that you will understand what is happening with your sleeve and what you can do to make it more visually pleasing, or to choose the more historical sleeve that will often times give you more movement than the modern sleeve will give you.
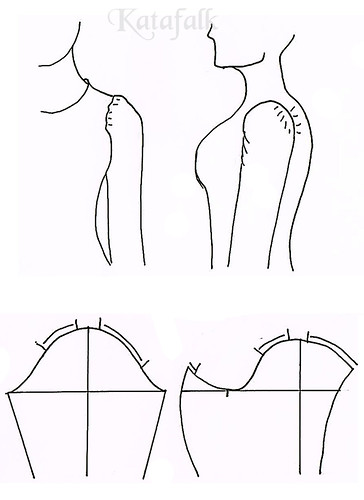
The sleeves will be shown from straight ahead and from the side. It shows what is happening with the sleeve on the body with the pulling and creases that might appear.
The sleeve will also be shown flattened as a pattern piece, both as a sleeve with the seam under the arm. but also as a historical s-sleeve. The solid line shows what we are starting with and the dotted lines shows how a “correct sleeve” looks in comparison. Note that a “correct sleeve” in this case is the more visually pleasing sleeve.
The armhole is the most important thing
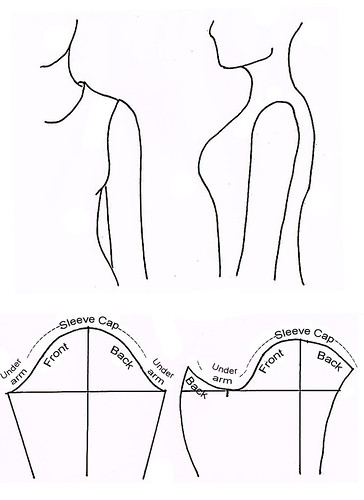
The most common mistake people make when setting a sleeve is to have an incorrect armhole on their garment.
On a modern garment the armhole is often big, the bottom of the armhole is at the bust point and the sleeve seam is places a bit out on the shoulder.
A historical armhole is always smaller, it is first when they started to sell ready made clothing that they had to make the armholes bigger to make the clothing fit a bigger range of people.
How high the sleeve sit under our arm is very important to make sure that you get a good range of movement in you garment.
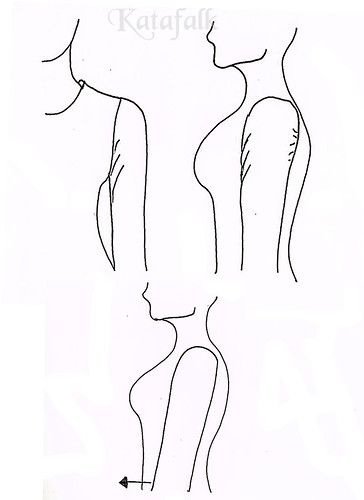
A lover armhole as shown as a solid line on the picture below will “lift” our entire garment when you raise your arms and you will get the feeling that there is a limit, you can not lift your arms higher. You can also get the feeling that he you lift your arm the seam will be pulled of your shoulder and it will pull both at the shoulder and armpit.
A more historical armhole sits a bit further into your body, as you can see as a dotted line on the picture below. It will give the ball of your shoulder more space and it sits tight up in your armpit. With this armhole you will feel that you can raise your arm higher without the garment is affected.
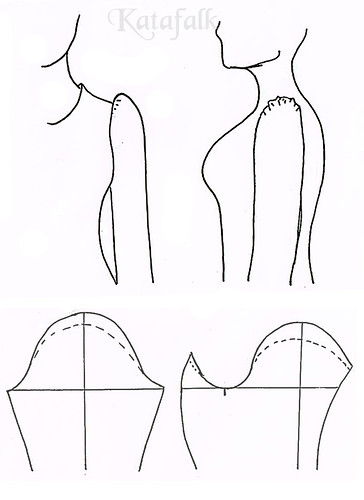
Low sleeve cap
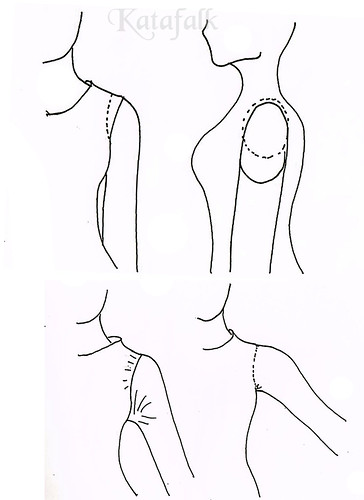
A clear sign of a to low sleeve cap is that some kind of creases in the fabric appears as the picture shows. It pulls from under the arm and if your sleeve is tight the shoulder sleeve might be pulled of the shoulder.
There are a lot of positive things about a low sleeve cap and also a lot of reasons that historical sleeves have a relativity low sleeve cap.
The lover your sleeve caps is the better movement your sleeve gets. The throwback is that you might have to live with the diagonal lines and pulling of the fabric and folds in the armpit. But as historical garments have a smaller armhole than a modern the result is that you will not need such a high sleeve cap.
That is why you can say that the lower your sleeve cap is the more movement your sleeve gets. Keep in mind that the best movement is given in a classic “t-tunic” with a completely straight sleeve and a gore under the arm.
But with that type of sleeve you will have to live with the fact that it does not sit completely smooth and pretty.
The set in sleeve is a choice that you make, if you want a pretty sleeve you will have to sacrifice the movement of the sleeve and vice versa. But as long as your armhole is small you will have a greater chance of getting a pretty sleeve with a low sleeve cap, than if you choose a bigger armhole that needs a higher sleeve cap.
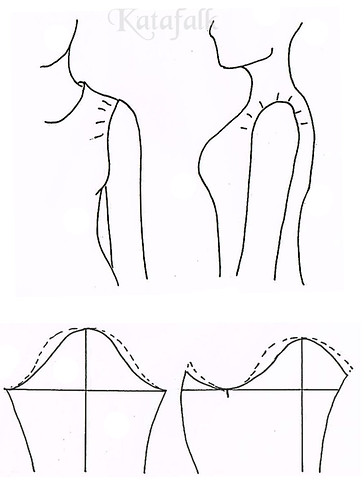
High sleeve cap
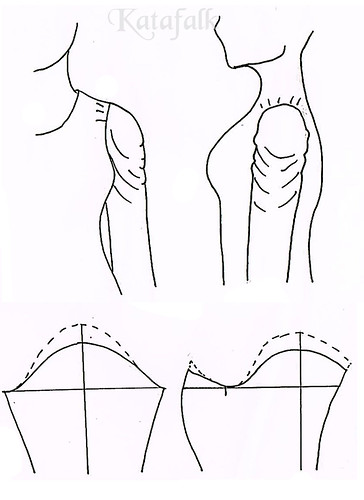
When you have a to high sleeve cap you will notice a slim puff sleeve at the top of your shoulder. It is high and it is clear that there is to much material in the top of your armhole.
A higher sleeve cap gives you a longer piece of fabric that needs to fit in your armhole. This might cause some puckering or gathers at the top of the sleeve cap, if you did not make a wider gathered sleeve by choice this is a clear sign that something is wrong.
You might want to say that a high sleeve cap always is the culprit in the drama about bad range of movement, but so is not the case. The bad range of movement is the result of a to big armhole that requires a higher sleeve cap if you wish to eliminate pulling and diagonal lines.
That is why you should not talk bad about the high sleeve cap, it is there because you want a nice smooth and well put in sleeve and can most often be found on modern garments that almost always have bigger armholes than the historical garments.
A historical armhole is always tighter against the body and smaller. It will therefore require a lower sleeve cap to get the same visual as the high sleeve cap in the modern armhole. The throwback with the modern armhole and high sleeve cap is that it will always have less range of movement then the historical one.
But it is your choice, do you sacrifice looks for function or the other way around.
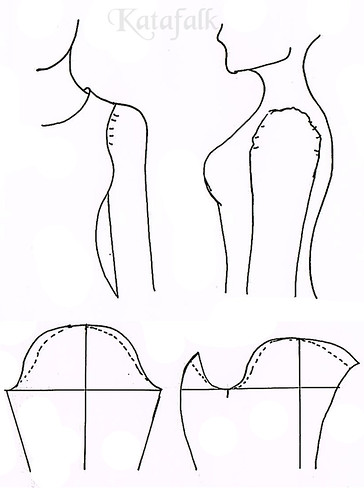
Slim sleeve cap
A slim sleeve cap will give you the feeling that it pulls a lot at the top of your sleeve. This is simply because there is not enough material to cover the ball of your shoulder. So the sleeve will pull fabric from your bodice and the sleeve seam will be pulled out onto your shoulder.
A modern armhole is bigger but also sits farther out on the shoulder than a historical armhole that is located on the inside of the ball of your shoulder.
This is why a modern sleeve often have a slimmer sleeve cap than what a historical garment needs. So when using a modern sleeve pattern when working on a historical garment you might end up missing an inch of fabric on your sleeve cap because the seam of the historical garment have been moved in further onto the body.
If you are only missing a inch or so you can solve this with the help of an iron. Using warmth and a bit of moisture, work in circular movements on the venter of your sleeve cap and sort of knead the fabric out.
This will of course only work if you are using wool, but in a fluffy wool fabric it might give you that extra inch of fabric if you are lucky. But be careful so that you do not distort the shape of your sleeve cap, remember that it is important to have a pretty shape.
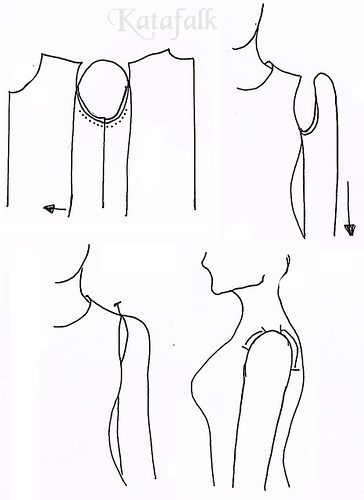
Wide sleeve cap
One way of seeing if your sleeve cap is to wide is to look at it from the side.
Does the sleeve feel unnecessary roomy in the sleeve cap? Then it might be that it is to wide. To have a wide sleeve is one thing, but to have a sleeve that is above everything else, wide at the top of your upper arm might not be that attractive, if you are not aiming for a “leg o mutton sleeve”
A to wide sleeve cap might also be notice by to much ease in your sleeve cap, so that when you are trying to set your sleeve smoothly you will get some tendency for puckering or gathers.
A wide sleeve cap is positive when you are making a puffed sleeve, then you need the extra width over the top of your upper arm so that the sleeve becomes not only puffy in the top but also lower down and to the sides.
But this is not often what you are looking for when wanting a smoothly set sleeve.
A mistake people do is to try and make it slimmer by taking away material in the seam under the arm. But is is important to look where it is puffy and only slim it down where it is needed, in this case only in the sleeve cap.
The wrong fit of the bottom of your sleeve
To be honest I do not know the technical term for this area of the sleeve, but it is the area that is 2-3 inches beside your side seam/underarm seam. this is the area under your arm where the bodice and sleeve lays always exactly against each other.
This is why it is very important that these places have the exact same shape, as they are always going to lay against each other.
If they are not the same shape you will notice this as a “bubble” will form under your arm, as if it was just a few cm to much material only under your arm.
This is because you are forcing the bottom of the sleeve to lay flat against a shape that is different from its own.
The rule is usually that you should follow the shape of the armhole of the bodice if it has a nice shape. Put the sleeve pattern against your bodice pattern, front to front, trace the shape of the bottom of the sleeve of the bodice for 2-3 inches and then make sure that is connects with the sleeve cap line with a nice shape.
Do the same on the other side of the sleeve, put it back to back, trace the bottom of the armhole and meet the top of the sleeve cap line in a nice shape.
When you draw a sleeve the shape of the line is important, if it is smooth and not wobbly on the pattern the same thing will be true on the body.
Incorrectly distributed ease
Does it feels that you have all this extra material on the front of your sleeve of the other way around, then you might have distributed your ease incorrectly.
But what ever is ease?
When you make a sleeve it needs to be a bit bigger than the armhole to be able to be put in nicely. The extra length of the seam of the sleeve needs to be eased in when you are setting your sleeve and the result is supposed to be a totally smooth sleeve without puckering or garters at the top.
If you have no ease at all you might end up with your armhole looking a bit gathered.
A higher sleeve cap needs more ease to sit correctly on your arm and a lower sleeve cap needs less. The result of this is that in historical garments you end up having less ease as the naturally needs less. This is because of the fact that they often have a lower sleeve cap.
You can say that you need 0,4-2 inches of ease depending on the material, but you can some times squeeze in even more.
The ease is distributed differently in the front and the back of the sleeve.
In the front it is concentrated over a short distance. This is because you need the extra width there so that the sleeve goes over the ball of your shoulder in a nice way without pulling.
At the centre of your shoulder, 0,6 inches on each side of the shoulder seam you need no ease at all.
At the back the ease is distributed over a longer distance, as you are flatter in the back of your arm.
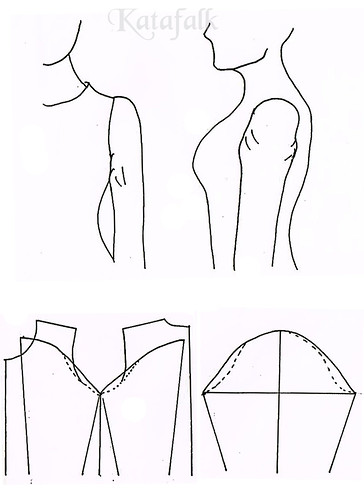
Wrong position
Does it pull in the back is is a lot of material in the front of the sleeve or the other way around? One might think that the problem here is incorrectly distributed ease.
It does give the same kind of feeling but in this case the problem is that the sleeve have been angled in the wrong direction when it was set, in the drawing below it was angled backwards.
A sleeve should be angled a bit forward to look good on the body. You can often see on historical garments that they often have a exaggerated forward facing sleeve.
This is also often combined with a sleeve that does not fall down to the sides of the body as a modern sleeve but is bent forward already in the pattern.
This might feel a bit of in the beginning when you are not used to it, but is most likely made in this way to give the prettiest sleeve when worn. If you think about it, it is not that often that you walk with your arms straight down, they are often a bit bent forward.
To set a sleeve, step by step
Start by sewing the side, underarm and shoulder seams. Press them well and sew them down as you want.
Put one of the armholes of the bodice over your knee with the shoulder seam facing up. So that your knee peaks out of the armhole and you can see the side seam.
Put the sleeve right on top of the armhole and match the bottom up with the side seam. Make sure that you put it in the right way, the sleeve cap is always a bit more roomy in the front so that the ball of your shoulder will have room and flatter in the back. Also make sure that the sleeve is positioned right, a bit titled forward.
Then baste the bottom, 2-3 inches on each side of the side seam.
Turn the sleeve and garment right side out and hold it either in your hand or put it on a doll or better yet, the person you are sewing the garment for.
Make sure that the sleeve falls nicely, a bit tilted forward and that the area under your arm is smooth and nice, watch out for that “bubble”.
Using your hand, follow the sleeve upwards and simply lay the top of your sleeve cap against the shoulder seam. Make sure that there is no pulling in any direction and that is is straight.
Distribute the ease on each side of the shoulder seam by all the rules in the book and baste the rest of the sleeve.
Control the sleeve and adjust as needed after this guide.
Then sew in the sleeve for real.
I hope that this guide might help you in some way, remember, the sleeve is your friend not your enemy.