It always starts with the idea, I see someone in a outfit that makes the gears in my head turn furiously. So I do a lot of looking at pictures, on paintings and then I sketch my idea. The sketches always look something like this.


Many lines and text, explaining to myself what my idea is, the drawings are not made for someone else to look at, only so that I can remember that great idea I had about that specific detail.
I have collected my “housebook” dress pictures on a separate pinterest board, if you wish to have a look.
This dress is interesting, with the silly pleated part in the front, the low cut neck. There is a lot of details in the look and as always what I find interesting is “how does this work with my boobs?!


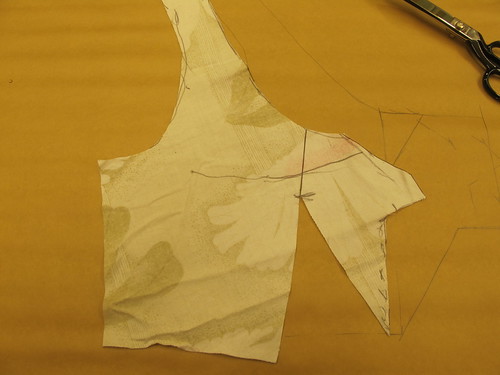
And as always when dealing with a difficult model, I start with a toille. Drawing new lines, cutting it up after those lines and making it work. The front piece is a square, and then the shape for the bust is pinned to this piece, this makes all the shaping for the bust invisible, as on the finished garment it looks like straight lines.


The pieces, now comes the real pattern work.


The old darts of the toille is cut away and then put together to close up the pattern pieces for one single pattern piece without the seam. Some of the width is lost, but if it is only this small amount you will not notice it.


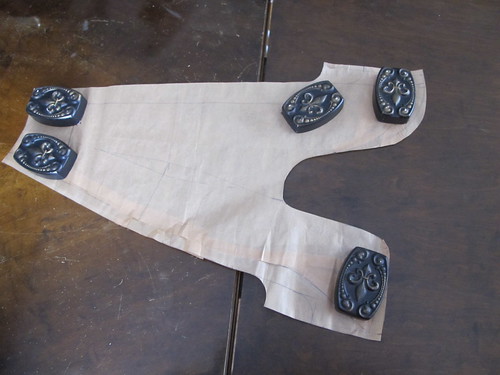
The pattern when finished looks like this I have added a skirt piece that widens in stead of putting in gores. As the paintings show no visible lines for gores in the skirt, and they show every other seams there is. The pictures show wide hems, so I did this and also have 75cm of fabric in the front and back pleated panels.

Here we have the panels, my panels are 75cm wide, and the front panel have a slit down the front to allow for an opening of the dress centre front.

I have a sturdy linen as a base for my panels.


I decided to make rolled pleats. Many recreations have stuffed cartridge pleating, but looking on the paintings and drawings they never have more then ten pleats, but very wide hems on the dresses, so I decided that even if there is no “evidence” for rolled pleats in this period they would be perfect. There is no need for stuffing the pleats, they fall just as in the pictures and you can get a lot of fabric to fit on a small area.


They are made like this, They are sewn onto the linen linings with running stitches.

then they are rolled one at a time and secured like this.

The dress is then sewn and the pleated panels inserted in the front, they are attached at the top like this.

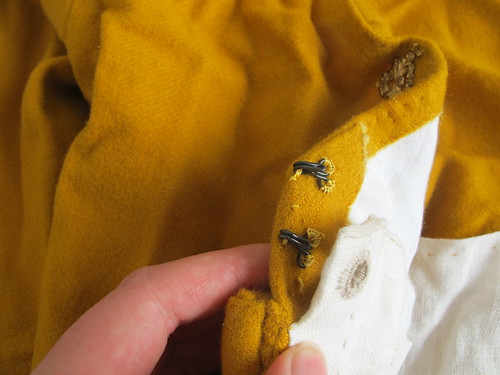
I decided to do the open back sleeves, so here we have lacing holes, they look like golden silk suns.


They are backed with a sturdy linen.

I sew in silk with buttonhole stitches, as this makes for neater and sturdier buttonholes, and it is also the period way to do.


The neckline is a single fold hem finished with stab stitching and on the back with a filler thread.

Last thing is to finish the hem. I always put the dress on, make someone put one needle in each seam at the height of where I want my hem. Then I take it of, fold the dress in half and make a nice line working from these needles.


As I did not want to take away the wools ability to stretch and shape around the body, I only put lining around the waist, where I wanted to make sure that there was no tension on the pleated panels. If they strain you can be sure that the hidden lacing will show. There is a corsets steel behind the lacing holes, to keep it all straight and nice. I guess the period way would to have reeds there in stead of modern spring steel.
The Lining is only secured in the back with big stitches, and then in the side seams and at the front on the pleated panel.
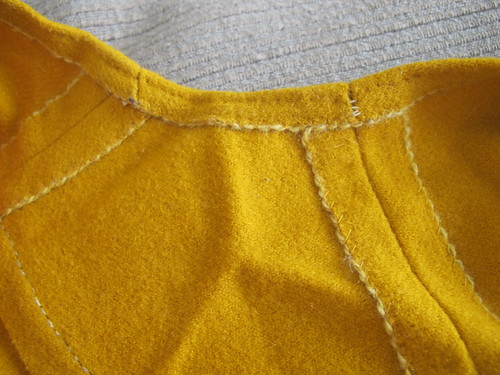
A picture on neat seams in the inside.
I have hooks and eyes in the top, as the lacing only goes up to the height of the pleated panel.


The sleeves have one continuous lace, I did not work that well to have it free so I have stitched it to keep it from bunching up when wearing the dress.

There is many pictures with elaborate veils, so I was inspired to make something that looks like “Meister des Amsterdamer Kabinetts: Das Gothaer Liebespaar” so I made a paper guide where I made a hole in each crossing with a big needle and then made dots on a thin linen fabric with the help of a pen.

The long lines was couched in silk.


And then I made stars with the same silk but another tone over each crossing.


Some details in the front.

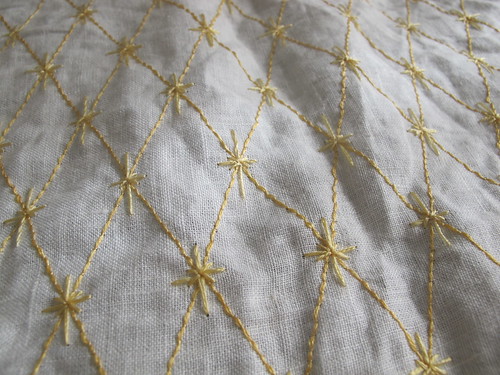

Sadly there was not enough silk to make the last three stars, but this place is hidden in the back and never visible.


Under the dress I wear my Lengberg castle brassiere, and to wear over that I made a now hemd, I use the same method as in my kampfrau tutorial, but in stead of the high neck I choose to make it low and only honeycomb smock and to have less fabric in the body.
Then there came the problem of closure of the top of the dress. When I saw the big golden closure of THIS and THIS ladies I was in love, but with no metal working skills there was no way that I could make them.
But then suddenly I saw this blog post. And of course! I can make one like that to.


So I turned to good old Etsy and ordered a pile of golden filigrees and started building. Layering the filigrees gave it a very nice solid look.

To top it all of I needed a wulstahube that was so big that it looked really silly. This was important for me, to make it so high that I could almost not wear it. There are numerous pictures of really big wulsthaubes in period artwork, and as I love the silly headdresses I wanted to top this silly dress of with something equally silly. As stuffing this wulst with fabric would make it to heavy I turned to thin birch branches that I made into a wulst and padded with linen wrapping.
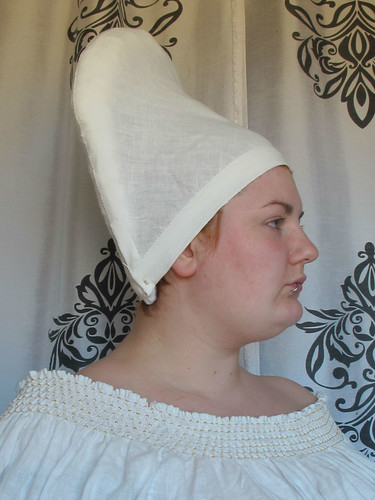
And yes it turned into a really silly wulsthaube, it took me several weeks to decide if I could wear it. But I finally started to like the sillyness of the height.
And this is how the dress turned out, the yellow and golden dress.


for some reason I saw the scetches and thought the pleats were a contrasting colour, so the end result looks a little more tasteful than I expected – I have to say I do like a mustard yellow though
and your fabric wieghts are nice
I did wonder if the golden closure thing I made for Renika had inspired yours. :) Good job, it all looks great!
What beautiful work! I love seeing the step-by-step photos; it’s so much clearer than explaining with words. Love the smocking and the embroidered veil too. Well done!
The inside is gorgeous, you have great hand stitching! Love the colour as well!
First up, just wow! I always love your finished outfits, and this one is no exception! Thank you for showing how you made it in such detail. :)
I think the hat looks in very good proportion with the dress. Not too silly! Which is amazing, because I find almost all medieval period hats exceedingly silly.
And finally, I love your line drawings. They immediately reminded me of those done by Janet Arnold for “Patterns of Fashion”. I have that book and pour over it occasionally, just to soak up those drawings.
Cheers :)
Wow! Super-impressive! Also, it’s very kind of you to put all the in-progress photos up. It’s great to be able to see all the details.
Wonderful work! I love your explanations. :-)
Oh my good-This dress is amazing! I really felt in love with your blog…it helps me to get motivated for my new houppelande :)
I meant to comment here, sorry about that.
Amazing dress and great post!
How lovely you look!
Just found your blog and I am enthralled! Beautiful look!!! You are so exquisitely skilled!!!
This is just soo effervescently lovely.
Hi really like your blog I have been looking an example of particular hat depicted on an Irish woman in the 16th Century in Germany that has, for the most part, puzzled a lot of people and I think your blog has answered the question, what is she wearing on her head as it is definitely not an Irish garment. http://irisharchaeology.ie/wp-content/uploads/2013/12/16th-century-Irish-women.jpg the two women (left married and right unmarried) the black hat is unusual in an Irish context its possibly a Wulstahube?